It's been 1 year since I started my blog. And 261 posts later...I'm still here and growing by the day! A big thank you to those who have stopped by everyday (Hi Dad and Mom!), those who have encouraged me along the way (Hi Ryan!), those who have joined me along the way, and those who have flattered me with a shout-out on their own blogs.
I started blogging after being inspired by Judy Crawford, a speaker at a MOPS meeting, to "Pursue the Dream."
And in pursing my dream, I have enjoyed seeing the art of homemaking in blogland this past year. I love seeing people passionate about making their homes beautiful for their families...from what they hang on the front door to what they put on their dinner table.
Living far from my family and my hometown, I am constantly trying to make my new home "feel like home." Obviously being surrounded by my husband and children takes the cake. But there are other "things" I find that help make me feel more at home.
I feel like I belong when I am active and involved at our church and my children's schools. I also feel a sense of rapport when we take part in activities and events around our community. I like making family traditions and good memories for my children. Consistency, being surrounded by what is familiar (including the faces of family and good friends), and knowing what to expect make any place feel more like home to me. Nothing replaces the feeling of walking into my childhood home, and so I want to give that same feeling to my own children.
Thank you for making this blog feel like home to me!

Tuesday, January 31, 2012
Monday, January 30, 2012
Felt Valentine's Decor
Here are some cute craft ideas I found on pinterest for Valentine's Day. All are made using felt.
This centerpiece is made from felt flowers. Very sweet. You could do all pinks and reds and use it for Valentine's Day.

(Felt centerpiece tutorial found here.)
I love the fullness of this heart wreath. So pretty.

(Wreath tutorial can be found here.)
And of course I love the Valentine fortune cookies I made last year out of felt. Very fun.

(Fortune cookie tutorial found here.)
Friday, January 27, 2012
Cake Balls

These are the most amazing sweet you may ever enjoy. They are so good. And a perfect treat for Valentine's Day!
Cake Balls
1 cake (any flavor)
1 can of frosting (any flavor)
1 24 oz. bar of almond bark (again, can be chocolate flavor or white chocolate flavor)
(When I made these I chose chocolate cake with chocolate frosting with chocolate flavor almond bark...in my opinion one can never have too much chocolate!)
Bake cake according to directions on box.

Then crumble the cake.

Mix with the can of frosting.

It helps if you chill this mixture for a bit.
(By default, I ended up covering this and doing the rest the next day.)
Form balls with the cake/frosting mixture. Then melt the almond bark.
(It really works best to melt small amounts of it in the microwave.)

Dip the cake balls into the melted chocolate. Let dry on wax paper.
Then...ENJOY! Any time I make these they go FAST!
You can get creative with the cake/frosting combinations...here are some other ideas:
Carrot cake with cream cheese frosting coated with white chocolate.
German chocolate cake with chocolate frosting covered with milk chocolate.
Lemon cake with white icing covered with white chocolate.
You can also add sprinkles to these before they harden.
Yummy!
Linking with:
Thursday, January 26, 2012
Shower Curtain Road Map
With the doldrums of winter settling in, Jude and I made this road map together. (Originally pinned here. They have an easy idea for making your road width the same on the entire map.)
I bought a white shower curtain liner from the Dollar Store. We spread it out on the basement floor and drew the road to our city (by no means an accurate representation.)

Then we added some of our favorite places around town with a black sharpie marker.

The kids have slowly started coloring in some of their favorite places.
 |
| I wish we were able to stop by the pool right about now! |
And a famous race car has been making frequent visits all over town!


And even making pit stops in our driveway!

Wednesday, January 25, 2012
4 Ways We Used Our Christmas Ham
Every year Ryan's office hands out hams for Christmas. It is a generous gesture that we look forward to every year. Since there are only 5 mouths in our family (if you count 1 year-old Ellen) and we don't usually host any large gathering around the holidays, most years we end up with a lot of ham on our hands.
I don't know of many recipes that are centered around ham, but after 8 years of Christmas hams I have gotten a little creative.
1. Ham Sandwiches. The first week or so we usually enjoy ham sandwiches on kaiser rolls. With horseradish of course.
2. Breakfast pizza. This is easy and a good "breakfast for dinner" meal for us. Simply unroll 1 can of crescent rolls in the bottom of a greased 9 x 13 pan. Scramble 6 eggs and pour on top of crust. Add shredded cheese and cubed ham. Bake for 20 minutes at 350.
I don't know of many recipes that are centered around ham, but after 8 years of Christmas hams I have gotten a little creative.
1. Ham Sandwiches. The first week or so we usually enjoy ham sandwiches on kaiser rolls. With horseradish of course.
 |
|
|
 |
| Image - (Made with sausage) |
3. Ham and Cheese Croissant Roll-ups. These were a big hit this year. Clare categorized them as a "football game food" and they would probably be great for the Superbowl. Take one crescent roll triangle and put a large piece of cubed ham and a large cube of cheese on the large part of the triangle. Roll the crescent roll around the ham and cheese. Place on a baking sheet and bake at 350 for 20 minutes.
 |
| (Similar to this, only with blocks of ham and cheese) - pillsbury.com |
4. Ham and navy bean soup. I modified a recipe I found to appeal to the tastes of our family. (Original recipe call for carrots...but some people here...not Jude or I...don't care for the taste of cooked carrots.)


Ham and Navy Bean Soup
1 cup dry navy beans
2 cups cubed ham
1 Tbsp. butter/margarine
1 medium onion, chopped
3 celery stalks, chopped
1 bay leaf
1/2 tsp. salt
1/4 tsp. pepper
2 cups sliced carrots - optional :)
Rinse beans. Combine beans and 4 cups of water. Bring to a boil, reduce heat and simmer for 2 minutes. Remove from heat. Let stand covered for 1 hour. Drain and rinse beans, set aside.
In a large pot melt 1 Tbsp. butter or margarine. Cook onion and celery, add cubed ham. Cook until softened. Stir in beans, salt, pepper, bay leaf, and 5 cups of fresh water. Bring to boiling, reduce heat. Cover and simmer for 1 - 1 1/2 hours (or until beans are tender.)
Add carrots if desired. Simmer, covered for 15 minutes or until carrots are tender. Season to taste with salt and pepper.
Linking with these parties.
Tuesday, January 24, 2012
Homemade Laundry Detergent

I saw the recipe for making your own laundry detergent on pinterst awhile ago. (Found here.) It seemed to get rave reviews and since my husband calls me cheap (I prefer using the title "bargain shopper") I wanted to give it a try.
I normally use Arm & Hammer Laundry Detergent with Oxiclean. I usually buy the 32 load container for around $6. I didn't keep track of the cost for the ingredients for this detergent, but the original post says the cost was around $20. I've done about 5 loads of laundry with it already and haven't made a dent in it, so I'm sure it's going to last awhile.
Ingredients for the detergent are:
1 4 lb 12 oz box Borax
1 4 lb box Arm & Hammer Baking Soda
1 box Arm & Hammer Super Washing Soda 55 oz (3 lb 7 oz)
3 bars of Fels-naptha soap
2 small containers (3.5 lbs. total) of Oxiclean (optional)
I have to admit that the messiest part of doing this was grating the soap. (At first I tried using my small food processor, but didn't have much luck. And I also feared that my next batch of basil pesto would end up tasting a little sudsy.)

I combined everything and put about one third of the detergent (along with the scoop that came with the oxiclean) in a big plastic container. You can use 1 - 2 scoops per load.

So far so good. I figure we really threw this laundry detergent straight to the fire because Ellen had the stomach flu and we used it on several important loads over the weekend and it worked like a champ!
And I like the mild smell of the detergent, too.

Monday, January 23, 2012

Friday, January 20, 2012
Orange Julius

Jude's preschool teacher shared this recipe with us after she made these for his
class during "orange week." They were a huge hit with the kids and Jude
was especially excited to enjoy this school treat at home.
(And who can resist a little extra vitamin C this time of year?)
Orange Julius:
6 oz. frozen orange juice concentrate (half of a frozen can)
1 cup milk
1 cup water
1/4 cup sugar
1 teaspoon vanilla
8 ice cubes
(**I found it was easy to get the concentrate out of the can by running a knife around the edge of the can first.)
Blend all ingredients together.
Enjoy!

Thursday, January 19, 2012
Busting the Winter Doldrums
I did a little reorganizing here and there over the weekend.
A lot of Clare and Jude's board games, crafts, card games, puzzles, and other small pieced odds and ends are in this cabinet in the kitchen. The only problem with that is they can't get to any of these things by themselves because the cabinet looks like this:

Such is life with a 1 year-old who puts everything in her mouth.
So in an effort to make some of their goodies in their reach (and out of away from others) I bought some plastic drawers and reorganized the coat closet off the kitchen to accommodate them. Now the older kids can open the door (Ellen doesn't do doorknobs) and find their things in their own designated space.

I'm sure the contents speak for themselves as to who each drawer belongs to...


And the top drawer for some of our favorite card games.

PS - I also added new tabs at the top of my blog to organize things on here a bit. :)
Wednesday, January 18, 2012
"Frosted" Privacy Window
We have small sidelight windows on either side of our front door.

(This is an old picture...I have since painted the door black to match the shutters on our house.
See here.)
And here's how it looks from the inside.

There wasn't much privacy with nothing covering the windows. And between neighbor children peering in to see if we were home (Ryan loves that!) and trying to hide from door to door salesman, we wanted some privacy.
Awhile back I tried to hang curtains like these on the windows.

But I had to hang the curtains with magnetic curtain rods because there is no room to add a tension rod. That just meant that the kids pulled them down everytime they wanted to see who was at the door. So I returned the sheer curtains and magnetic curtain rods and was back at square one.
And then....{enter pinterest} I found a great (and cheap-o!) solution. I found out that you can make your own privacy film type window covering from CONTACT PAPER!
(Similar to this, but about 1/5 the price tag.)
(Idea found here. Thanks Greg and Ashley!)
I reduced the size of the stencil they posted on their blog because my windows are smaller.

Then I traced and cut and traced and cut.
(This reminded me of the felt leaf garland I made.)
I did most of my cutting out in the school parking lot waiting for my kindergartener.

And here's my progress after finishing the one side.


And the view from outside at night.

I like the pattern and the privacy.
PS - Even though it looks frosted, this is just regular old contact paper.
Thanks for stopping by...feel free to stop and stay awhile! :)
Linking with these parties.
Friday, January 13, 2012
Conversation Stones
My MOPS leader found this idea on pinterest and we made them at our meeting this week.
(Originally found here.)


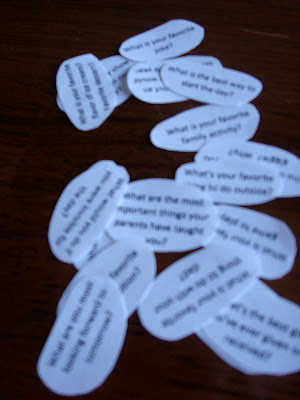


My kids were really excited about these and it was fun to hear some of their answers last night!


These are easy and inexpensive to make. We have some sitting on our tables at our meetings to initiate conversation and made these for our dinner tables. I think they would also be fun for a shower with questions about the bride-to-be or even to make a bunch to use as a fun family game night activity.
All you need are large glass stones (found at the Dollar Store)

and conversation questions printed out

...and cut out to fit the size of the glass stones.

Just mod podge the questions onto the back of the stones...


and let them dry for about 24 hours.

My kids were really excited about these and it was fun to hear some of their answers last night!


What was not fun or funny, though was when the pottery bowl that was holding the conversation stones broke. Pretty much because Clare had made that bowl (if that wasn't obvious) and there were lots of tears about "her first piece of pottery breaking" and that "she would never be able to make another bowl that looks like that again."
But that just made for a good answer to: "What are you most looking forward to tomorrow?"
"Making a new pottery bowl."
Linking with these FUN PARTIES.
betweennapsontheporch.blogspot.com
todayscreativeblog.net
gingersnapcrafts.com
betweennapsontheporch.blogspot.com
todayscreativeblog.net
gingersnapcrafts.com
Subscribe to:
Posts (Atom)